SNR-Mate© A Useful, Effective, and Simple Test Lost to Time and Sound Card Changes

A number of years ago, two colleagues, relaxing after a day’s work in hearing aid design, discussed the use of SNR (Signal Noise Reduction) measurements as a standard tool for evaluating hearing (pre- and post-fitting) of hearing instruments fitting. That SNR testing was an important tool had been well-established, although not often used. At the time, the HINT and QuickSIN tests were available, with the HINT requiring greater time and effort.
A suggestion was made that something embedded on existing laptop computers that took most of the guesswork out of the process would be beneficial – essentially a downloadable software program ready and EASY to use.
Within a short time, a software program was developed that could be used with the HINT or QuickSIN, but which could be used for other SNR testing – hence the name SNR-Mate.
Goal
The goal was to develop a very easy-to-use and inexpensive approach to clinically measure the SNR Loss as an outcome measurement using nothing more than a computer, a CD player, and an attached set of speakers, allowing its use with a laptop computer for portability. The CD player was not needed if the SNR words and noise were stored on the computer.
The Application Program
The program was contained in a zip file containing a group of installation files. This was loaded to a PC (Mac could be used as well providing it was running some kind of PC compatible program).
When up and running, the only screen to be seen is that shown in Figure 1.
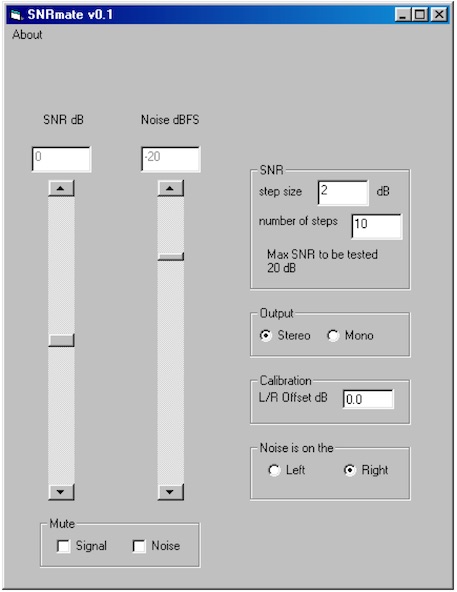
Figure 1. SNR-Mate screen. This is the only screen one had to work from to perform a SNR test easily using essentially a laptop computer and a set of speakers.
Screen Explanation
- The leftmost slider is the SNR adjust. The value up/down can be adjusted with a mouse or with the arrow keys. This is the bar used to raise or lower the speech stimulus, and when finished, reads out with the SNR value in the top box.
- The slider titled Noise dBFS set the overall attenuation for the incoming noise. Negative numbers are natural because if one wants a positive SNR, only the Noise can be biased to a negative value because neither the Signal nor Noise is allowed to go above Full Scale (i.e., 0 dBFS). The significant feature is that one can usually ignore this slider all together because it has a more intelligent interface (labeled SNR) just to the right.
- Within the SNR box, simply type in the desired step size to be used for testing. Entering the number of steps resulted in 2 actions. First, the Noise slide jumps to the product of step size multiplied by the number of steps. Secondly, the SNR slider ends up centered on 0 dB and the range of operation automatically becomes ± Max SNR to be tested.
- The box labeled Output selected whether one had one speaker (Mono) or more than one (Stereo). The tester could select either, but if Mono was selected initially, this had the effect of placing the appropriately weighted Noise and Signal test stimulus on both the left and right outputs.
Calibration could be used for compensating out the analog mismatches in the CD player and A/D converters in the computer sound card. However, this was designed that the starting point had no errors, and therefore, designed to leave the calibration at 0 dB. So, no calibration was required.
Having a Noise is on the… selection was intended to deal with possible reversals in left and right signals coming into the computer’s sound card – so the tester knew which ear was which.
Mute was useful for helping sort out which channel the noise was actually in. Simply mute the Signal and then toggle between Noise is on the... Left and right settings leaving the selection at the position where one actually heard the noise from the HINT, other type CD, or loaded test stimuli.
Things to Consider
- To get the audio routed from the built-in CD player of the computer (or its storage location in the computer) through SNR-Mate and out of the computer’s speaker system:
- Depending on the computer and software being used, the speaker icon in the system tray was double clicked to launch the PC mixing panel (Figure 2).
- The CD was to be muted and that Wave and Play Control (may show up as Master or Volume Control, but usually the left-most one) were NOT muted and that the sliders should be up closer to the top.
- Actual settings were not important to calibration of SNR but would affect absolute level. However, measurements were made as relative level (but the magnitude between the signal and noise was appropriately calibrated), so no real difference in measured results should show.
- To play the actual CD:
- Go to Start ...Programs ...Accessories ...CD Player
- On some systems there may be an Entertainment folder under Accessories that holds the CD Player.
- Start your testing.
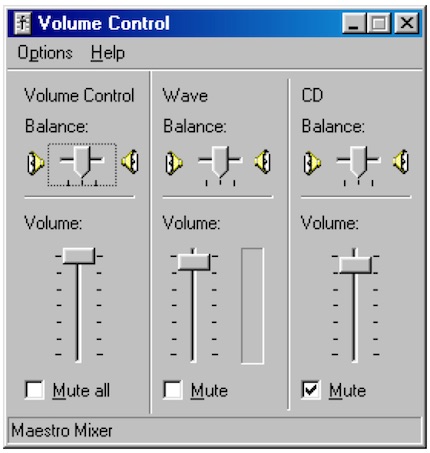
Figure 2. Required PC mixing panel and settings for the SNR-Mate to operate correctly.
The interface was designed intuitively so that detailed instructions were unnecessary.
So, Why Did the Audiology Community Not Hear About This?
The problems were related to the PC operating system. The program was written for the XP, where it worked extremely well. However, the “improved” operating systems introduced by Microsoft after the XP did not allow for the sound card to be used in the same way, and the entire program would have had to be re-written. The decision was made not to pursue re-writing the program whenever Microsoft came out with another “improved” or “redesigned” operating system. And so, what was considered a good thing, bit the dust like many other “good things.”
*SNR-Mate is a copyright in 2004 by Steve Armstrong and Wayne Staab